Whether you’re hunched over the dining room table, cradling your laptop from your half-sitting-half-lying-down position from the sofa, or even using an ironing board as a standing desk, our new working from home situation is causing havoc to our posture. And let’s face it, bad posture and back pain were a reality for many people long before we were forced into a pandemic-driven lockdown.
As London’s leading reformer Pilates brand, and home to expert physios and massage therapists, we’ve put together some key moves and tips on how to avoid back pain whilst working from home during self-isolation.
1. Move regularly
Granted, the average apartment (especially in London) may not seem like a big space to keep moving around in but we strongly recommend regular movement intervals to help combat negative changes from prolonged periods of sitting.
Ten’s Head of Physio says; “Every time you get up, it’s a chance for your body to reset. Try walking whilst taking a phone call or doing some shoulder rolls as you go to put the kettle on. Little bursts of movement are better than long uninterrupted periods of sitting.”
2. Keep it level
A big contributor to back and neck pain is flexion due to looking down at our screens. Your screen should be at a level where the top is at – or slightly below – eye level, so that you’re only looking slightly downward when viewing the middle of the screen. Equally, your laptop or monitor should be about an arm’s length away from you and your elbows should be at a perfect 90 degrees when typing. To achieve both the correct height of the screen, and keyboard position, you really need to use a USB keyboard/mouse, and have the laptop propped up on book or a laptop stand. “These are essential tips for keeping in an upright posture and putting as little extra pressure on your shoulders, neck and back as possible,” says Ten.
3. Alternate the sit and stand approach
The common misconception is that standing desks are better than sitting at a desk. The truth is, both have their merits but it’s mostly about balance. Ten comments: “The duration of any position is the biggest risk factor, so just like sitting for too long, using a standing desk for too long also presents a number of issues. Alternate between the two – with good form in each. This means sitting as upright as possible when seated and keeping both feet equally weighted on the floor directly beneath you when standing.”
4. Be mindful of your WFH fitness choices
You’ve been sitting down most of the day, hammering away at your emails and spending hours crouched over your laptop for the daily zoom-call – so there’s real musculoskeletal impact to all that screen time. The best way to counter this is through exercise. Ten warns; “By not exercising, the negative changes continue to get worse in a vicious cycle. A lack of core strength, hip, pelvic and spinal mobility and possible degenerative changes leave you at a much higher risk of injury anywhere along lower limbs or trunk.”
Exercise is vital but it’s also about the right kind of exercise. Although doing a high-impact HIIT session in your living room or garden may let off some steam, the lack of a proper warm up – and in particular, exercises to reset your posture before you begin to load the body in earnest – will increase the risk of injury. Additionally, with no instructor present, it’s easy to let your form and posture slip, which can also impact negatively, The best exercise for the back is focussed on core control, and then strength, rather than speed and exercising to exhaustion. Pilates is the answer to this in more ways than one. “Pilates teaches isolated control to certain muscles and is a brilliant way of integrating this control into more functional movement patterns.” Ten points out.
So next time you roll out the workout mat, consider a low-impact but still highly effective virtual Pilates or barre session instead of a high-impact HiiT one. Your back will thank you later.
5. Sleep it off
Different mattresses are a common complaint for back issues. Typically, a firmer mattress offers more support and allows you to wake up fresh. Ten recommends the flip technique; “If you find you’re stiff and achy in the mornings, try flipping your mattress. Over time, we leave quite an imprint on our mattress – so flip it for a new area to lie down on and then remember to turn it over regularly. The right mattress should always be partnered with a good pillow. Feather ones feel nice, but a firmer foam one is often better for you, I highly recommend the Tempur original contour memory foam pillow.”
Here’s a short daily sequence of mobilising movements for a pain-free lower back and healthy spine
What you need
Start by setting aside 8-10 minutes, once (or even better, twice) a day and preferably during the evening, before bed. You’ll need a little space and, dependent on the type of floor, a mat. The space required should be long enough for you to lie down on your back and wide enough for a full snow angel! Your own body is all the equipment you need.
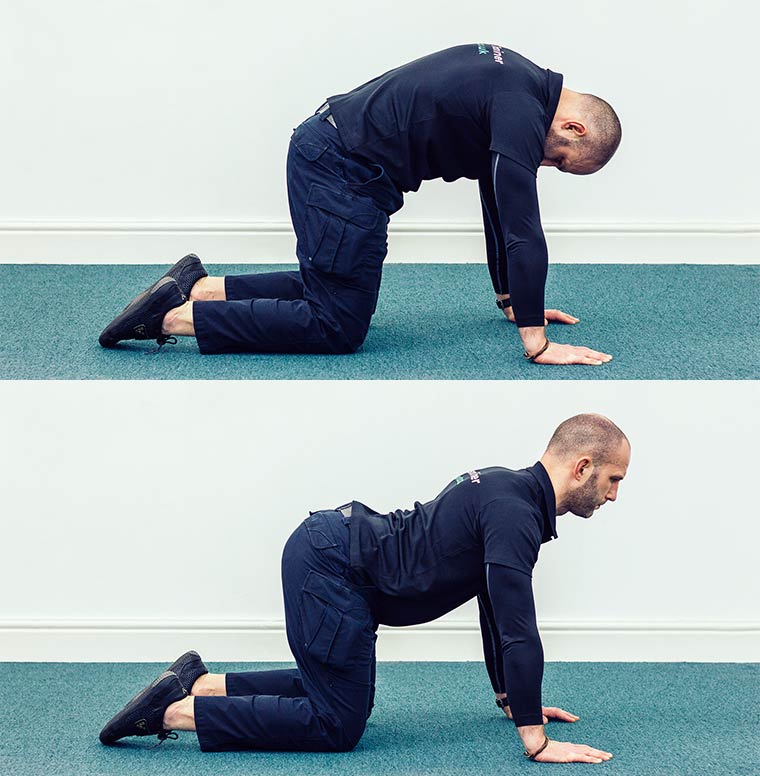
CAT AND COW STRETCH (FLEXION/EXTENSION)
Let’s start with a little mobiliser. The ‘cat/cow’ stretch creates both extension and flexion (bending and lengthening). The stretch requires you to be on all fours, keeping a tidy technique by having your knees aligned with hips and wrists aligned with shoulders. While taking a big, deep breath in, arch your entire spine towards the ceiling (like an angry cat). Whilst doing this tuck your head between your shoulders and your tailbone between your legs. We’re now going to create the polar opposite movement, by creating the ‘cow’ part of the stretch. During the following exhale, we allow the spine to gently drop towards the floor. This creates an inverted arch to the lower spine and a little extension to the upper spine. As a result of the movement, the head lifts (a little) and the hips tip forwards towards the floor. Due to the fluid nature to the exercise, it can be done in slow, repetitive motions. However, if you feel as though you are gaining a benefit from a particular phase of the stretch, then you can hold it for the desired length of time. It affects/stretches large parts of the spine within a simple, time-efficient movement.
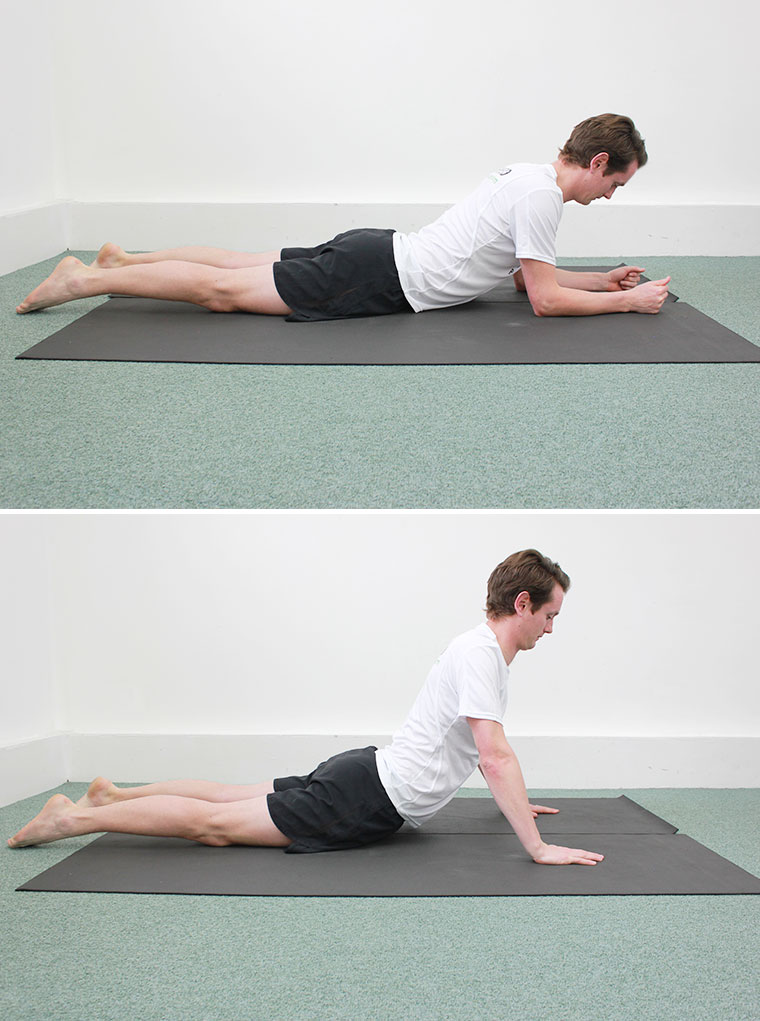
PASSIVE SPINAL EXTENSION
Prone lying extension work (similar to the ‘cobra’ position in Yoga) is perhaps the best way to undo a sustained period of sitting. Lie flat on your front and relax for 1-2 mins before rising up onto your elbows and holding up there for 2-3 mins then returning to lie flat. Progress that further by pressing all the way up into full extension (using your arms not your back), hold the top for 2 seconds and return – you can repeat the full extension 10 times or so.
*If this position creates pain at first go, try the ‘cricketers stretch’ below, and try again, if you keep getting pain that doesn’t ease, you should consult a Physio
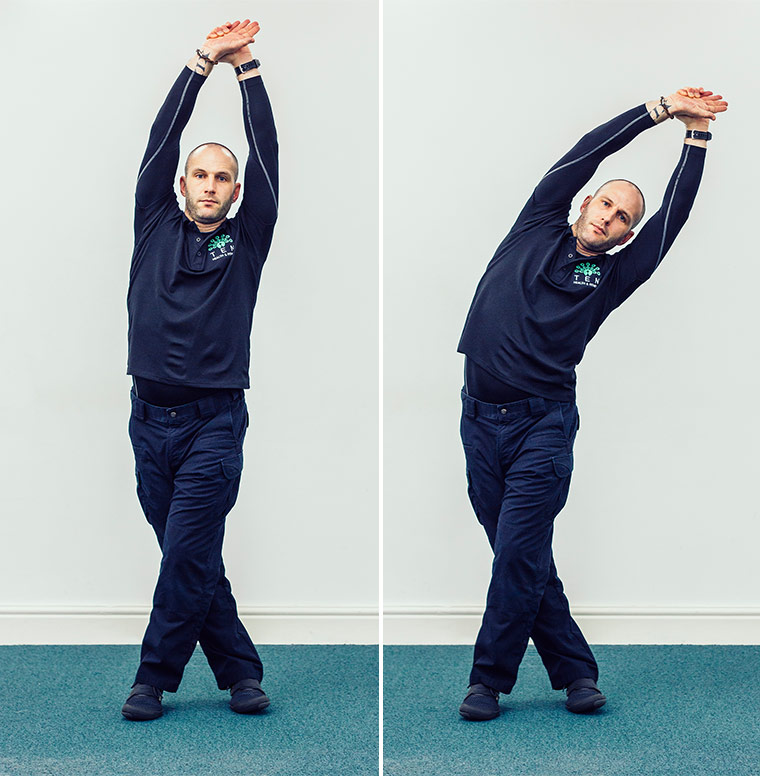
SIDE STRETCH (LATERAL FLEXION/EXTENSION)
The side stretch requires 2 sets, 1 on each side. Stand with both feet on the floor. Cross the right foot in front of the left, taking as wide a stance as possible. Then extend both arms towards the ceiling, gently taking the right wrist in the left hand.
Now take a nice deep breath in, drawing the right wrist to the ceiling. On the exhalation, gently pull the right wrist overhead and towards the left side. This creates a crescent or banana shape to the body (and in this case), stretching the (muscular) structures between (the right side) ribs and hips. Taking a small number of deep breaths in (and out) will enhance the stretch. However, due to the reduced lung capacity, release the stretch and reapply the stretch when necessary.
Repeat for the opposite side – i.e. with the left foot in front of the right, and the left wrist in the right hand.
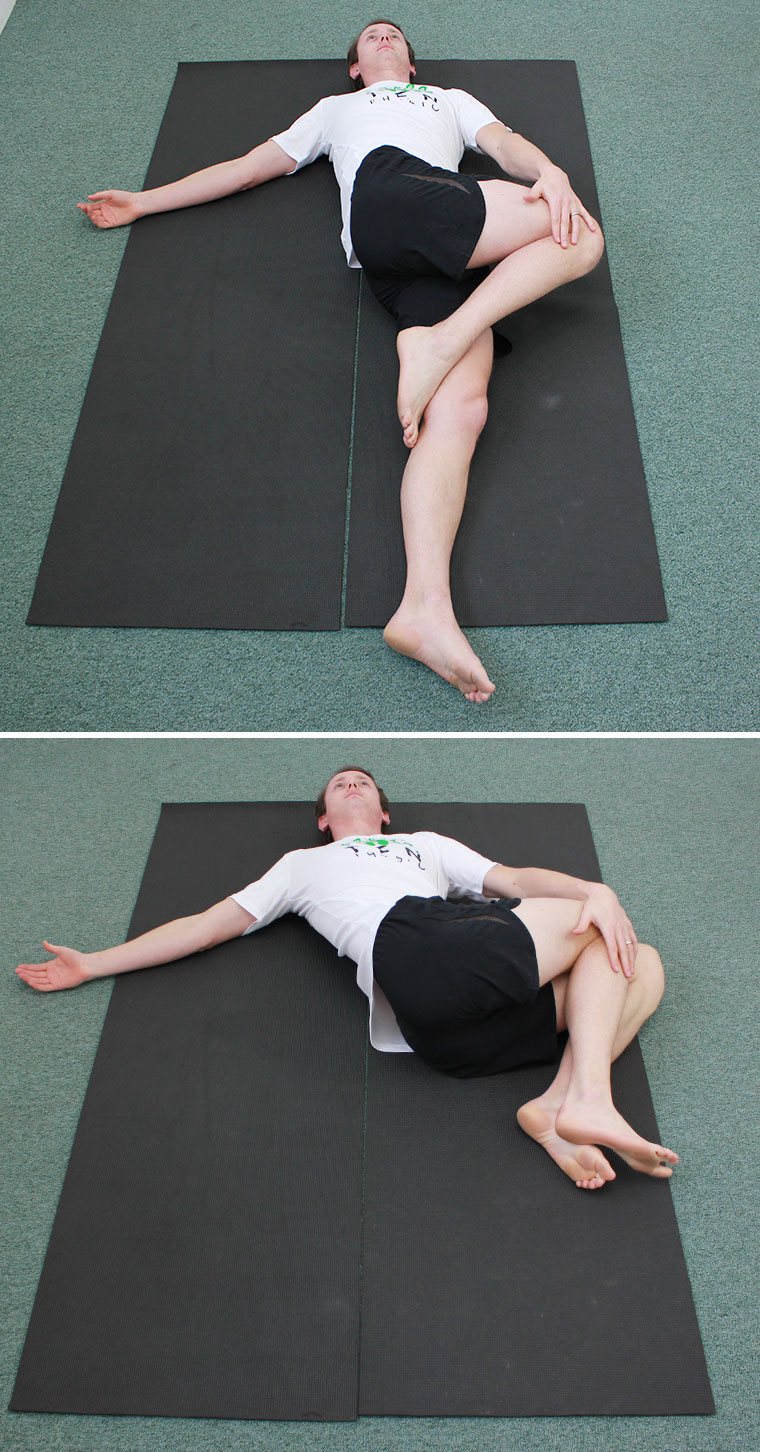
CRICKETER’S STRETCH (ROTATION)
In similar fashion to the stretch above, this requires a set on each side. This stretch focuses on the rotational element of your spine, coming mainly from the part that rotates the most: the thoracic (middle) spine. Lie on your back, with your legs tucked together and your arms out to the side, at shoulder height. Bend your knees, so that your feet are flat on the floor and knees remaining together. Tip your knees to the right side while keeping your left shoulder blade in contact with the floor, and slowly allowing the knees to fall towards the floor.
Due to the nature of this being a rotational-based movement, we are likely to feel the stretch develop on the left (opposite) side of the body. (You may even feel your spine ‘crack’ a little as it rotates. This is normal.) Again, use your in and out breaths to facilitate the stretch. A quick note on this particular stretch – if you have very little movement within this stretch, don’t force it. It may take a little time to develop your full range. Again, repeat for the opposite side, with the knees falling towards the floor on the left-hand side ensuring that the right shoulder doesn’t lift.
There is always a most efficient way to deliver a stretch. However, don’t be afraid of moving your spine within its limitations. Your body’s muscles will tell you how far you can naturally take each stretch. Whenever you can, hold the stretch for 1-3 deep breaths in and out, as the surrounding muscular structures respond to the increased lung volume.