For many active sportsmen and women – particularly runners, footballers and raquet sports players – degeneration in the knee joint and cartilage tears are common issues. And they can often limit your ability to continue your chosen sport.
Cyclists are luckier. The impact on the knees is considerably less, and people can often continue cycling long after their knees have prevented them from continuing other sports.
But – and it’s a vital but – only if the bike and set-up is correct. Otherwise tension will build up, exacerbate any knee injuries/issues, and eventually create quite a lot of discomfort and pain.
So here are some key bike selection and setup tips. (After all if you’re spending all that time and effort and money on the gear, best make it the right gear and the optimal setup.)
 1. Getting the right size frame
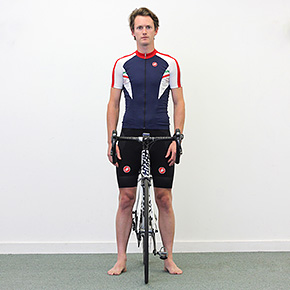
The easiest way to check a frame size of a road/hybrid bike is to stand over the top tube (horizontal bar). With your feet flat on the ground, there should be about a 1-inch clearance under your perineum. (Check with your local bike shop regarding the specific frame as each manufacturer has different geometry.)
It goes without saying that you should never, ever, buy a bike that you haven’t had your hands on (or more to the point, your leg over).
2. Setting the correct seat height
This is a little more complex, but after the frame selection, this is the most important thing you can do. So stay with me on this.
Sit on the seat, feet on the pedals. With your foot at the lowest point of the pedal’s travel, stop and straighten your knee. Pressing your heel towards the floor, you should be able to almost fully flex your ankle (dropping a few degrees below the axle of your pedal), and then when you bring your foot back flat, you should have a nice small bend in your knee.
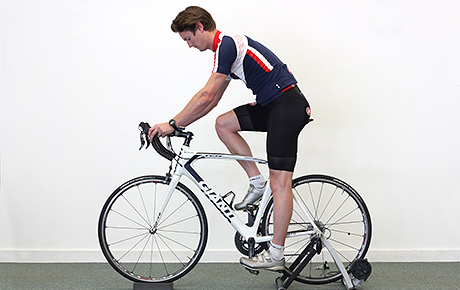
When you have this right, you should see that when your knee is at the bottom of your pedal stroke (with your foot flat), it should be bent to 145-155 degrees (180 degrees is considered to be when your knee is straight).

3. Seat position
Once the seat’s at the right height, make sure it’s in the right position relative to the handlebars and pedals. You do this by dropping a plum line (or a weighted piece of string) from the front of your forward knee (when the pedals are horizontal to the ground),
With a properly set up seat, the line intersects the centre of the pedal axle. If your knee is too far forward, the seat needs to go back and vice versa.
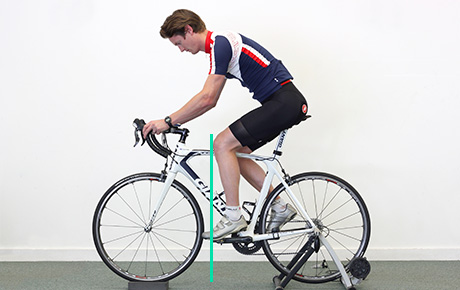
NB: In order to maintain the optimum angle for your knee (see above), if you take your seat forwards you’ll also need to also raise it and conversely, if you push it backwards, you’ll need to lower it.
4. Pedals and cleats
My favourite pedals are the Shimano SPD’s, and I do recommend the yellow cleat, which has 6 degrees of ‘float’ meaning that your leg is able to rotate slightly. This is kinder to the knee than a fully fixed cleat (as in mountain bikes) where the side-to-side angle of the knee is effectively set by the cleat, rather than your own body geometry. And if this is off by as little as 1-2mm, it’s enough to cause problems on the outside of your knee.
5. Pedal stroke
Now that you have the right gear, set up the right way, the next step is to ensure you’re pedaling efficiently by balancing the use of your muscles.
When wearing cleats (fixed to the pedal), the focus of your pedal stroke should – counterintuitively – not be on pressing down on the pedals. Instead, concentrate the effort on dragging your foot along the bottom and up (like scraping mud off your shoe). This makes you more efficient and enables you to engage your hamstrings as well as your cycling-dominant quadriceps.
NB: When your foot is at the lowest point of your pedal arc, it should be horizontal to the ground (a lot of people allow their heel to rise, thus over flexing the knee.
6. And relax
Finally, when you’ve got everything else right, releasing tension with a combination of Massage/Foam rolling will prevent overuse injuries.
I say, forget stretching after rides. Use a foam roller instead. After some of my longest rides, I have spent up to an hour on the rollers focusing on my ITB (outside of thighs) TFL (front corner of your hip/pelvis, lateral quads (front outside corner of your thigh), Quadriceps (front of thighs) and your Glutes (buttocks).
There’s no getting away from the fact that it will hurt like hell the first few times. But grin and bear it. First, it’s a good kind of pain. And second, it gets easier with (regular) practice.
Using a foam roller is like visiting the sports massage therapist, only at home, cheaper and at your convenience. It takes away the knots and tightness in muscles. Once you have the correct set up, using a roller can take your pains away, and perhaps more importantly, prevent them from starting in the first place/prevent them from coming back.
Think of the foam roller as being your daily maintenance, but – and it’s an important ‘but’ – if you are training a lot, you should still get a regular Sports Massage every 2-4 weeks to ‘reset’ you.
Let’s put it this way – it takes a lot less time, effort and pain to prevent an injury than to recover from one.